
Description
Most sound masking systems inject noise into an otherwise benign environment. In this environment, the occupants must raise their voices above the noise level to communicate, which invariably, eliminates the benefit of noise masking.
Our noise masking system injects noise into the environment perimeter and not directly into the environment. This approach allows normal conversation while defeating eavesdropping devices that rely on acoustic leakage.
Features:
The Audio Nullifier Pro II offers two channels each with a truly random noise source. Both channels have a separate high and low frequency control in order to compensate for loses found in the environment’s material composition.
* 2 Separate Channels
* Truly Random Noise Sources
* High Frequency And Low Frequency Controls
* Overload Protection
Specs.
Weight: 1.2 lb. (.5 Kg)
Output Max: 10 V p-p @ 6 ohms Min.
Load: 2 ohms
Frequency: 125 Hz 4 kHz
Power: 12VDC, 1A
Includes:
1- Audio Nullifier Pro II
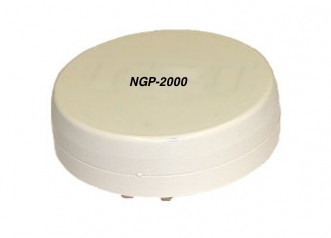
1- NGP-2000 Transducer: (A specially designed Transducer used to inject acoustic noise into walls, finished ceilings, windows, plumbing, and air ducts.)
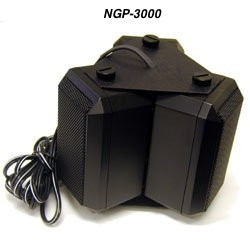
It is Recommended That Customers Order An Additional (2) NGP-2000 Transducers And (1) NGP-3000 Speaker.
WHAT YOU NEED TO KNOW….The Audio Nullifier Pro II comes with 1 NGP-2000 Transducer this is not adequate for securing a larger room (see below) you may need to purchase more transducers and/or the Omini directional NGP-3000 Speaker with the additional accessories the Audio Nullifier Pro II will be more effective.
NGP-2000 Transducer Installation:
Introduction:
The ideal installation would be accomplished during construction or remodeling where sensitive points in the structure can be protected with transducers built into the building’s structure. If this is not possible, the transducers can be placed directly onto wall surfaces. If visual appearance is a problem, the transducers should be disguised or covered accordingly.
QUANTITY REQUIRED:
Determine the quantity of transducers needed by these recommendations:
WALLS One placed every eight linear feet, centered between floor and ceiling. Mount on or within 6 inches of a stud.
FLOOR and CEILING One centered on every 64 square feet. (Use the NGP-3000 Speaker for drop ceiling.)
WINDOWS One placed on every major frame of glass within 6in of the corner.
DOORS One placed adjacent to the center hinge on the door-frame.
The noise masking system consist of a main unit (the Audio Nullifier Pro II) and three optional accessories (mentioned above) that are purchased to tailor the system to the environment of concern.
The Accessories Are:
Optional:
NGP-2000 Transducer (One Is Included)
Optional:
NGP-3000 Speakers: (Omni directional Speaker is used with the Audio Nullifier Pro II to project acoustic noise into drop ceiling air spaces, closets, crawl spaces, and air ducts.)
Optional:
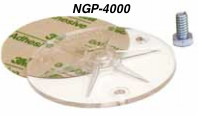
NGP-4000 (Window Mount): Mount provides a safe method of attaching the NGP-2000 to a glass surface.
Optional:
Audio Spectrum Analysis Software (ASAS-5000) for use with the Audio Nullifier Pro II. The software gives the user the ability to analyze the effectiveness of acoustic masking in a specific environment. Using audio noise to mask sensitive or confidential conversations is a useful technique that has been utilized for many years, however it is a basic technology that is often misunderstood and improperly implemented.
Our Audio Spectrum Analysis Software provides the capability to measure the audio that is absorbed by environmental structures, and then analyze and adjust noise-masking levels for an effective countermeasure.
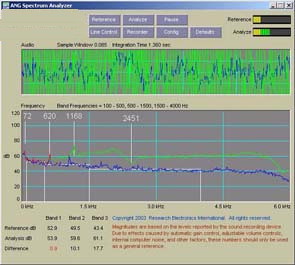
Purpose: To measure the audio being absorbed by environmental structures and then analyze and adjust noise masking levels for an effective countermeasure.
STEP 1: Make a reference measurement to get a baseline of the amount of noise being absorbed into the structure.
STEP 2: Inject masking noise into the structure and use the software to measure and adjust the level for effective masking.
In this manner, the ASAS-5000 software provides a useful tool for customizing the Audio Nullifier Pro II settings for different environments and different building materials.
The ASAS-5000 software provides a useful method for properly setting up, testing, and calibrating a noise masking system. Furthermore, ASAS-5000 can help reduce any confusion over White Noise, Pink Noise, and blanket noise masking. Consider the following:
* Different structural surfaces have different responses to audio. Some surfaces will respond more to high frequencies and some will respond to low frequencies, and many surfaces will have characteristic resonant frequencies.
* Many surfaces in a building will have inherent ambient noise from the building itself. This ambient noise may be due to structure-borne audio sources such as traffic noise, machinery, people walking, elevators, printing machines, etc.
* When measuring noise surfaces, it is easy to introduce error. These errors may be due to many factors such as the placement of the Acoustic Leakage Probe (included with the ASAS-5000 software), the method of holding the contact microphone, and the inherent noise in the sound card system used to measure the noise spectrum. The ASAS-5000 system is based on the comparison of before and after noise masking of all of the frequencies in the voice spectrum. This approach ignores the exact definition of White or Pink Noise and provides acoustic noise masking that is designed and calibrated for the specific masking application at hand.
NGP-2000 Mounting / Installation Instructions
Three basic mounting methods are suggested for transducers:
Direct Screw for solid surfaces; Hollow Wall Anchor for drywall
(sheetrock), plaster, and other soft or brittle materials; and Plastic
Disk for flat, smooth surfaces such as glass and plastic.
Attn: Always mount the transducer before connecting the wiring.
The disconnect terminals supplied with each transducer
easily push on to the lugs. This eliminates twisting the wire.
Direct Screw Mounting:
A “Screw Adapter” is provided with a dual head. One end has 10-
24 machine screw threads for the transducer, the other has coarse
tapered threads to be used in solid materials such as wood.
• If the surface is a solid material such as plywood, studs, or
wood beams, the transducer can be mounted directly.
1. Thread Screw Adapter into the transducer.
2. Drill a 1/8” pilot hole in the wall.
3. Screw the transducer clockwise into the pilot hole until it is
flush to the surface. DO NOT TIGHTEN EXCESSIVELY.
• If the material is soft such as ceiling tile or drywall, use a piece
of plywood and adhesive to attach the transducer to the softer
material.
1. Drill a 1/8th
2. Attach plywood to surface with adhesive or epoxy glue.
pilot hole in the center of a 3-inch square (for
drywall) to a 12-inch square (for ceiling tile) piece of 3/8” or
1/2” plywood.
3. Thread the Screw Adapter in the transducer.
4. Screw the transducer clockwise into the pilot hole until it is
flush to the plywood. DO NOT TIGHTEN EXCESSIVELY.
![]()
Hollow Wall Anchor Mounting:
For walls with fragile surfaces such as drywall, plaster, or thin
paneling, the transducer can be attached with a hollow wall anchor.
1. Use the 10-24-thread size hollow wall anchor included with the
transducer. Drill a 7/16” hole and insert the anchor. Thread the
screw until the wall anchor is tight.
2. Remove the screw from the wall anchor.
3. Screw the 10-24-threaded rod included with the NGP-2000 into
the transducer.
4. Turning the transducer clockwise into the wall fastener, tighten
the NGP-2000 until it is firm. DO NOT TIGHTEN
EXCESSIVELY.
![]()
Plastic Disk Mounting:
The transducer may be attached to plate glass windows or other
smooth surfaces using the plastic-mounting disk. The glass must be
firmly mounted to avoid vibration.
1a. For temporary mounting, use double-stick tape included with
the plastic disk and press the disk firmly to the clean and dry
surface.
![]()
NGP-2000 Installation (Permanent Mounting):
1b. For permanent mounting, discard the double-stick tape and
use a small amount of clear silicone exterior caulking
compound. Place a small thin layer across the disk and press
firmly and evenly to minimize air bubbles. This method
provides better coupling for high frequency response. Allow the
adhesive to set (usually 24 hours).
2. Screw the Transducer clockwise onto the plastic disc until firm.
DO NOT TIGHTEN EXCESSIVELY.
![]()
Attn: Be sure not to over tighten the transducer. The plastic
insert may be damaged.
Article: How Do I Defeat Hidden Microphones And Voice Recorders?
Note: An End User Certificate Must Be Completed And Approved Prior To Shipment of This Product.
Recommended Reading:
* Prevention and Detection of Electronic Harassment and Surveillance (PDEHS)
* How Do I Know If I’ve Been Bugged?


Reviews
There are no reviews yet.